
This document walks through an example flow for provisioning a new machine in Access Gate, across three steps: inventory, description, and access.
Treat it as a template. Adapt the fields, the assets, and the protocols to your own plant and your own runbook, and tick each step off as you go.
The example below provisions a water pump at a lift station. The same sequence applies to a PLC, an HMI, a CNC, or a camera.
Step 1: Add the machine to the asset inventory
Start with the minimum that lets Access Gate see and address the machine.
- Head to the asset inventory and select Add new Asset.
- Give it an asset name that an operator would recognise, not just a hostname.
- Add its IP. Use Add IP if the machine has more than one interface.
- Add the services it exposes, for example
modbus/tcpandssh:22. Use Add Service for each one. - Save.
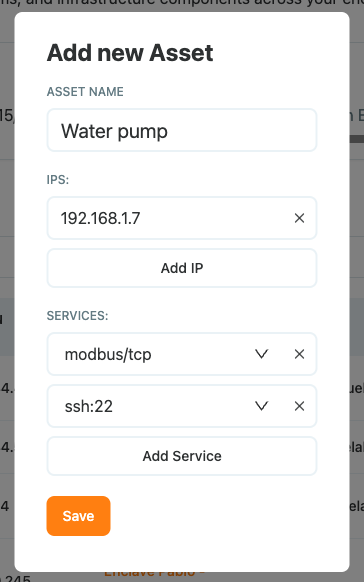
For discovering assets already on the network rather than declaring them by hand, see Building an Asset Inventory.
Step 2: Fill in what you know about it
The asset now exists. This step turns it from an IP into something identifiable.
- Open the asset and select Edit overview.
- Complete whatever you have: asset tag, model, serial, category, location, installation date, status, and security level.
- Write a description. This is the field that pays off later.
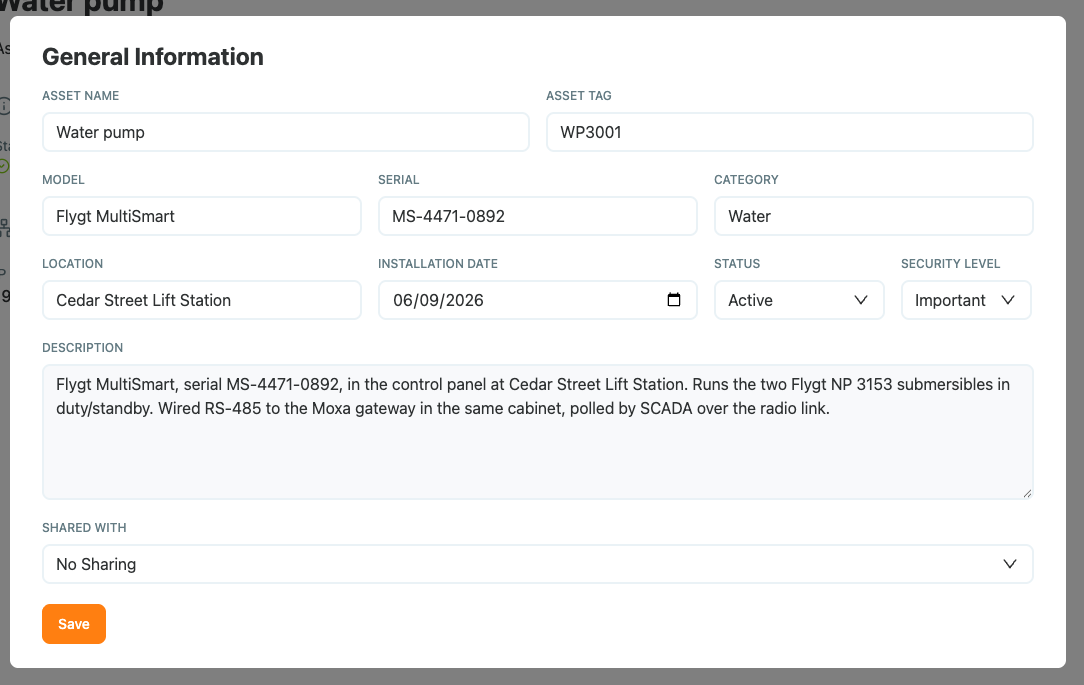
None of these fields are mandatory, and it is tempting to skip them. They are what makes the inventory usable during an audit or an incident, and the security level in particular drives how the asset is treated elsewhere in the platform.
A useful description says what the machine does and what it is wired to, not just what it is. The example above records the model and serial, the panel it sits in, the two submersibles it drives in duty/standby, the RS-485 link to the gateway in the same cabinet, and the fact that SCADA polls it over the radio link. That is the context an engineer needs at 3am.
Step 3: Create an enclave and allow the access it needs
The machine is inventoried and described. Nothing can reach it yet. This step grants the specific access it requires.
- Create an enclave for the machine, or add it to an existing one if it belongs with assets already grouped there. Here the pump joins the Cedar Street Lift Station enclave alongside the two HMIs at the same site.
- Give the enclave a description and an owner, so there is a name against it when someone asks who approves changes.
- Open Edit principals and set, for each person, which of the machine's services they can reach.
- Allow only what each principal actually needs, and leave the rest blocked.
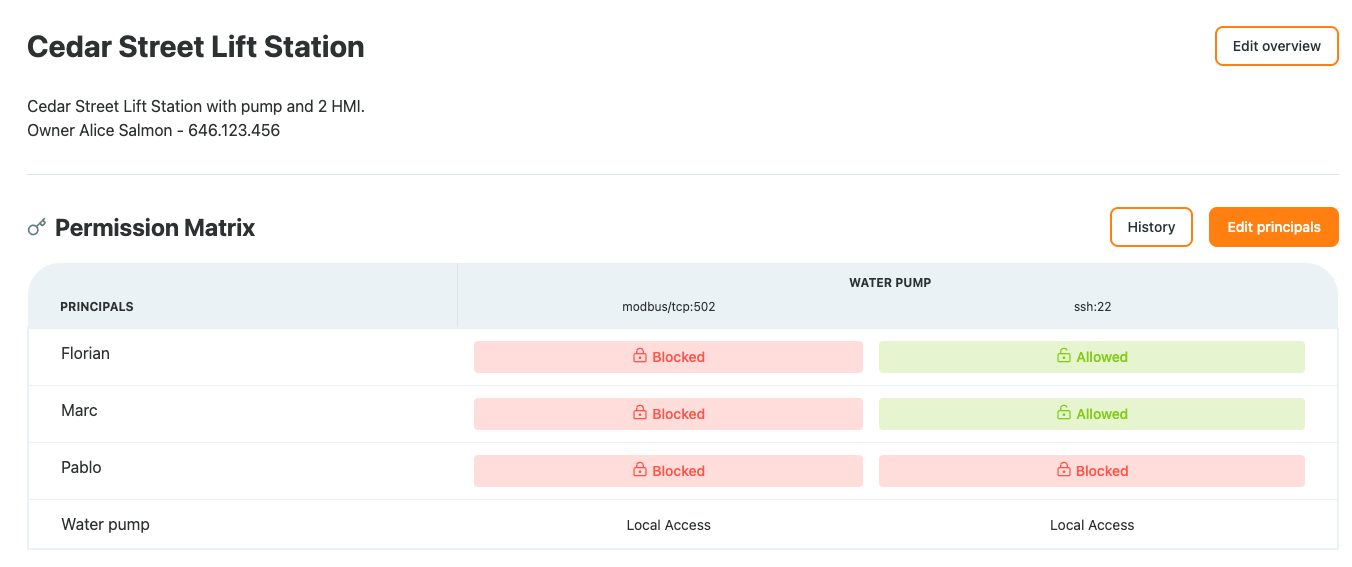
The permission matrix is the whole point of the step. Each row is a principal, each column one of the services declared back in Step 1, and every cell is an explicit allow or block. In the example above the two engineers reach the pump over ssh:22 for maintenance, nobody reaches it over modbus/tcp:502 from outside, and the pump keeps Local Access to its own services so the process itself is unaffected.
- Confirm the traffic you expect appears, and that nothing else does.
Because the enclave denies by default, a flow you forget shows up as a connection that does not work, not as an opening nobody noticed. Add it when it surfaces. For the full treatment, see Protecting an Asset with Enclaves.
What we have achieved
Across the three steps we have:
- Inventoried the machine with the name, addressing, and services needed to reach it.
- Described it well enough that an auditor or a responder can identify it without a site visit.
- Granted only the access it needs, inside an enclave that denies everything else by default.
The machine went from unknown to protected without any configuration on the machine itself. Every step happened in Access Gate, and the record it leaves behind is also the evidence you need when someone asks what is on the network and who can reach it.